部署Nginx的Ingress服务
基于官方文档提供的实例,我们开始通过自己的思路部署项目
部署两个nginx的Ingress服务,其中一个Ingress服务使用pv+pvc的nfs服务器挂载,另外一个Ingress服务使用pv+pvc的hostPath存储挂载,并创建nginx和Ingress-controller的hpa资源对象,来自动进行扩缩容,通过configmap配置nginx.conf调优,保证在高并发环境下,发挥Ingress的最大性能,使整个k8s集群性能得到提升,利于应对线上的各种复杂情况,自动化去感知业务。
本节yaml源码地址 https://download.yutao.co/k8s/ingress-project/ingress-nginx-pv/
第一个nginx服务
搭建nfs服务器
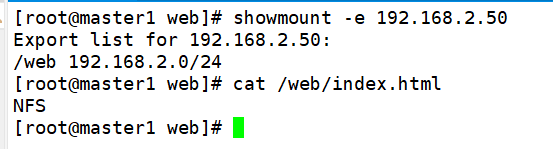
因为第一个nginx服务使用nfs挂载,所以首先在集群外的一台主机192.168.2.50搭建NFS服务器,挂载nfs服务器的/web/index.html到master的web/index.html,挂载内容index.html为NFS。
创建pv
vim pv.yaml
apiVersion: v1
kind: PersistentVolume
metadata:
  name: pv-nfs
  labels:
    type: pv-nfs
spec:
  capacity:
    storage: 5Gi
  accessModes:
    - ReadWriteMany
  storageClassName: nfs   #pv对应的名字
  nfs:
    path: "/web"           #nfs共享的目录
    server: 192.168.2.50   #nfs服务器的ip地址
    readOnly: false
kubectl apply -f pv.yaml
创建pvc绑定pv
vim pvc.yaml
apiVersion: v1
kind: PersistentVolumeClaim
metadata:
  name: pvc-nfs
spec:
  accessModes:
  - ReadWriteMany
  resources:
     requests:
       storage: 1Gi
  storageClassName: nfs #使用nfs类型的pv
kubectl apply -f pvc.yaml
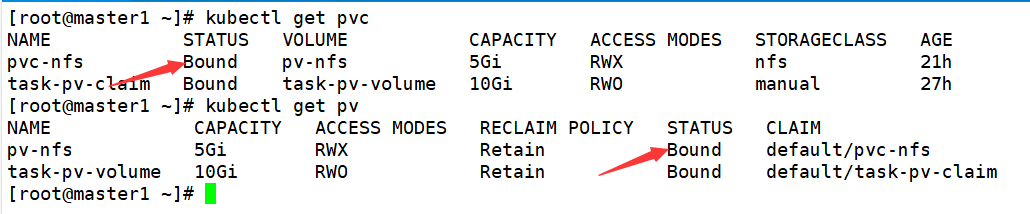
kubectl get pv
kubectl get pvc
创建第一个nginx的deploy和service
vim pv-nginx-deploy.yaml
apiVersion: apps/v1
kind: Deployment
metadata:
  name: nginx-pv
spec:
  selector:
    matchLabels:
      run: nginx-pv
  replicas: 3
  template:
    metadata:
      labels:
        run: nginx-pv
    spec:
      volumes:
        - name: task-pv-storage
          persistentVolumeClaim:
            claimName: pvc-nfs
      containers:
        - name: task-pv-container
          image: nginx

          resources:    #内存和cpu最低限制
            limits:
              memory: 100Mi
              cpu: 100m
            requests:
              memory: 50Mi
              cpu: 50m

          ports:
            - containerPort: 80
              name: "http-server"
          volumeMounts:
            - mountPath: "/usr/share/nginx/html"
              name: task-pv-storage
---
apiVersion: v1
kind: Service
metadata:
  name: nginx-pv
  labels:
    run: nginx-pv
spec:
  type: NodePort
  ports:
  - port: 8080
    targetPort: 80
    protocol: TCP
    name: http
  selector:
    run: nginx-pv
因为后面用到hpa水平扩展,所以增加了 resources声明cpu和memory,需要用到pv+pvc,开3个副本,并暴露service服务。
kubectl apply -f pv-nginx-deploy.yaml
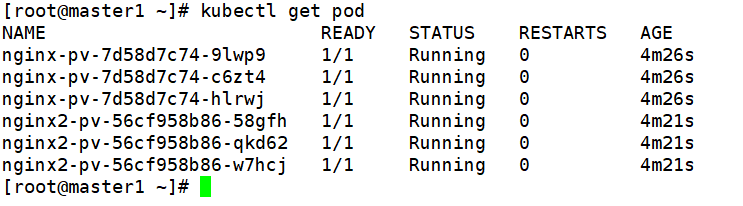
kubectl get pod

创建第一个nginx的ingress服务
vim nginx-pv-ingress.yaml
apiVersion: networking.k8s.io/v1
kind: Ingress
metadata:
  name: pv-nginx
  annotations:
    nginx.ingress.kubernetes.io/rewrite-target: /$2
spec:
  ingressClassName: nginx
  rules:
  - host: hello-world.info    #控制器绑定的域名
    http:
      paths:
      - path: /nfs(/|$)(.*)   #第一个服务的访问路径
        pathType: Prefix
        backend:
          service:
            name: nginx-pv
            port:
              number: 80
kubectl apply -f nginx-pv-ingress.yaml
kubectl get ingress

cat <<EOF >>/etc/hosts
10.10.121.81  hello-world.info
EOF
curl hello-world.info/nfs

可以看到可以基于域名路径访问到nfs挂载内容,所以nginx的ingress和nfs挂载已经生效,但是并不具备自动扩缩,所以需要配置hpa
基于HPA的极致弹性调度最佳实践
上面deploy已经声明cpu和memory资源,所以直接配置nginx的hpa
vim nginx-pv-hpa.yaml
apiVersion: autoscaling/v2
kind: HorizontalPodAutoscaler
metadata:
  name: nginx-pv-hpa
  namespace: default
spec:
  maxReplicas: 5 #最大副本数
  minReplicas: 1 #最小副本数
  metrics:
    # 设置触发伸缩的 CPU 利用率
    - type: Resource
      resource:
        name: cpu
        target:
          averageUtilization: 50
          type: Utilization
    # 设置触发伸缩的 MEM 利用率
    - type: Resource
      resource:
        name: memory
        target:
          averageUtilization: 50
          type: Utilization
  scaleTargetRef:
    apiVersion: apps/v1
    kind: Deployment #需要伸缩的资源类型
    name: nginx-pv  #需要伸缩的资源名称
kubectl apply -f nginx-pv-hpa.yaml
kubectl get hpa

前面的是memory后面的是cpu
配置好nginx的hpa,我们还需要对ingress进行调优配置hpa
vim ingress-hpa.yaml
apiVersion: autoscaling/v2
kind: HorizontalPodAutoscaler
metadata:
  name: ingress-nginx-controller-hpa
  namespace: ingress-nginx
spec:
  maxReplicas: 3 #最大副本数
  minReplicas: 1 #最小副本数
  metrics:
    # 设置触发伸缩的 CPU 利用率
    - type: Resource
      resource:
        name: cpu
        target:
          averageUtilization: 50
          type: Utilization
    # 设置触发伸缩的 MEM 利用率
    - type: Resource
      resource:
        name: memory
        target:
          averageUtilization: 95
          type: Utilization
  scaleTargetRef:
    apiVersion: apps/v1
    kind: Deployment #需要伸缩的资源类型
    name: ingress-nginx-controller  #需要伸缩的资源名称
kubectl apply -f ingress-hpa.yaml
kubectl get hpa -n ingress-nginx

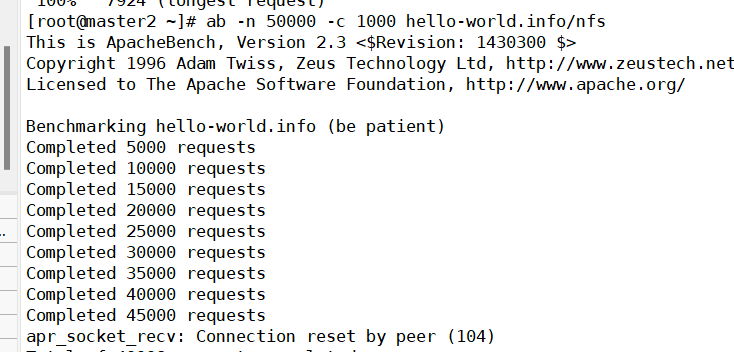
使用ab进行压力测试
yum install httpd-tools -y
ab -n 50000 -c 1000 hello-world.info/nfs
-n即requests,用于指定压力测试总共的执行次数。 -c即concurrency,用于指定压力测试的并发数。
等待压测结束执行命令
kubectl get hpa
kubectl get hpa -n ingress-nginx
可以看到nginx-pv的cpu压力升至87%,ingress-nginx的cpu压力升至200%


kubectl get pod
kubectl get pod -n ingress-nginx


可以看到nginx-pv的pod数量已经扩展到5个,ingress-nginx-controller的pod数量也扩展到最大的5个,停止压测,等待几分钟,可以看到nginx-pv的pod自动缩到1个,cpu降至0

而且我发现一个现象如果将ingress的最大副本数调高至10个,刚才那么大的并发数并不会引起扩缩
第二个nginx服务
创建pv
在node1节点创建一个/mnt/data目录存放挂载数据 index.html
mkdir -p /mnt/data
cat <<EOF >/mnt/data/index.html
Hello, world!
Nginx: 你访问的是Node1节点
EOF
在node2节点创建一个/mnt/data目录存放挂载数据 index.html
mkdir -p /mnt/data
cat <<EOF >/mnt/data/index.html
Hello, world!
Nginx: 你访问的是Node2节点
EOF
在master节点构建pv
vim pv2.yaml
apiVersion: v1
kind: PersistentVolume
metadata:
  name: task-pv-volume
  labels:
    type: local
spec:
  storageClassName: manual
  capacity:
    storage: 10Gi
  accessModes:
    - ReadWriteOnce
  hostPath:
    path: "/mnt/data"
kubectl apply -f pv2.yaml
kubectl get pv

创建pvc
master节点构建pvc
vim pvc2.yaml
apiVersion: v1
kind: PersistentVolumeClaim
metadata:
  name: task-pv-claim
spec:
  storageClassName: manual
  accessModes:
    - ReadWriteOnce
  resources:
    requests:
      storage: 3Gi
      #定义要申请的空间大小
kubectl apply -f pvc2.yaml
kubectl get pvc
kunectl get pv

创建第二个nginx的deploy和service
在master节点构建yaml
vim pv-nginx2-deploy.yaml
apiVersion: apps/v1
kind: Deployment
metadata:
  name: nginx2-pv
spec:
  selector:
    matchLabels:
      run: nginx2-pv
  replicas: 3
  template:
    metadata:
      labels:
        run: nginx2-pv

    spec:
      volumes:
        - name: task-pv-storage
          persistentVolumeClaim:
            claimName: task-pv-claim
      containers:
        - name: task-pv-container
          image: nginx
          ports:
            - containerPort: 80
              name: "http-server"
          volumeMounts:
            - mountPath: "/usr/share/nginx/html"
              name: task-pv-storage
---
apiVersion: v1
kind: Service
metadata:
  name: nginx2-pv
  labels:
    run: nginx2-pv
spec:
  type: NodePort
  ports:
  - port: 8080
    targetPort: 80
    protocol: TCP
    name: http
  selector:
    run: nginx2-pv
kubectl apply -f pv-nginx2-deploy.yaml
kubectl get pod
增加第二个nginx的ingress服务
vim nginx-pv-ingress.yaml
apiVersion: networking.k8s.io/v1
kind: Ingress
metadata:
  name: pv-nginx
  annotations:
    nginx.ingress.kubernetes.io/rewrite-target: /$2
spec:
  ingressClassName: nginx
  rules:
  - host: hello-world.info
    http:
      paths:
      - path: /nfs(/|$)(.*)
        pathType: Prefix
        backend:
          service:
            name: nginx-pv
            port:
              number: 80
      - path: /hostpath(/|$)(.*)
        pathType: Prefix
        backend:
          service:
            name: nginx2-pv
            port:
              number: 80
kubectl apply -f nginx-pv-ingress.yaml
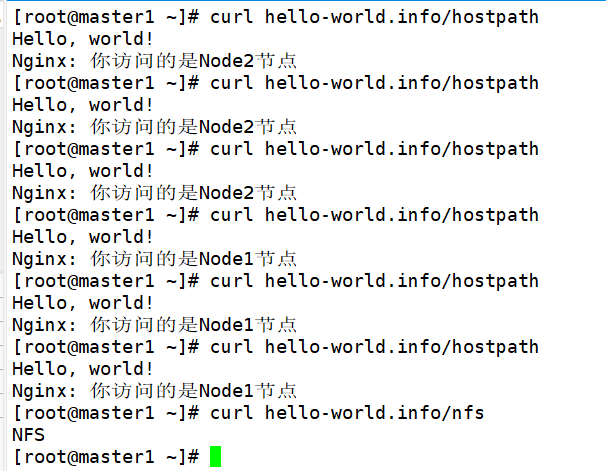
验证基于服务路径的路由的负载均衡效果
curl hello-world.info/hostpath
curl hello-world.info/hostpath
curl hello-world.info/hostpath
curl hello-world.info/hostpath
curl hello-world.info/hostpath
curl hello-world.info/hostpath
curl hello-world.info/nfs
使用Configmap调优
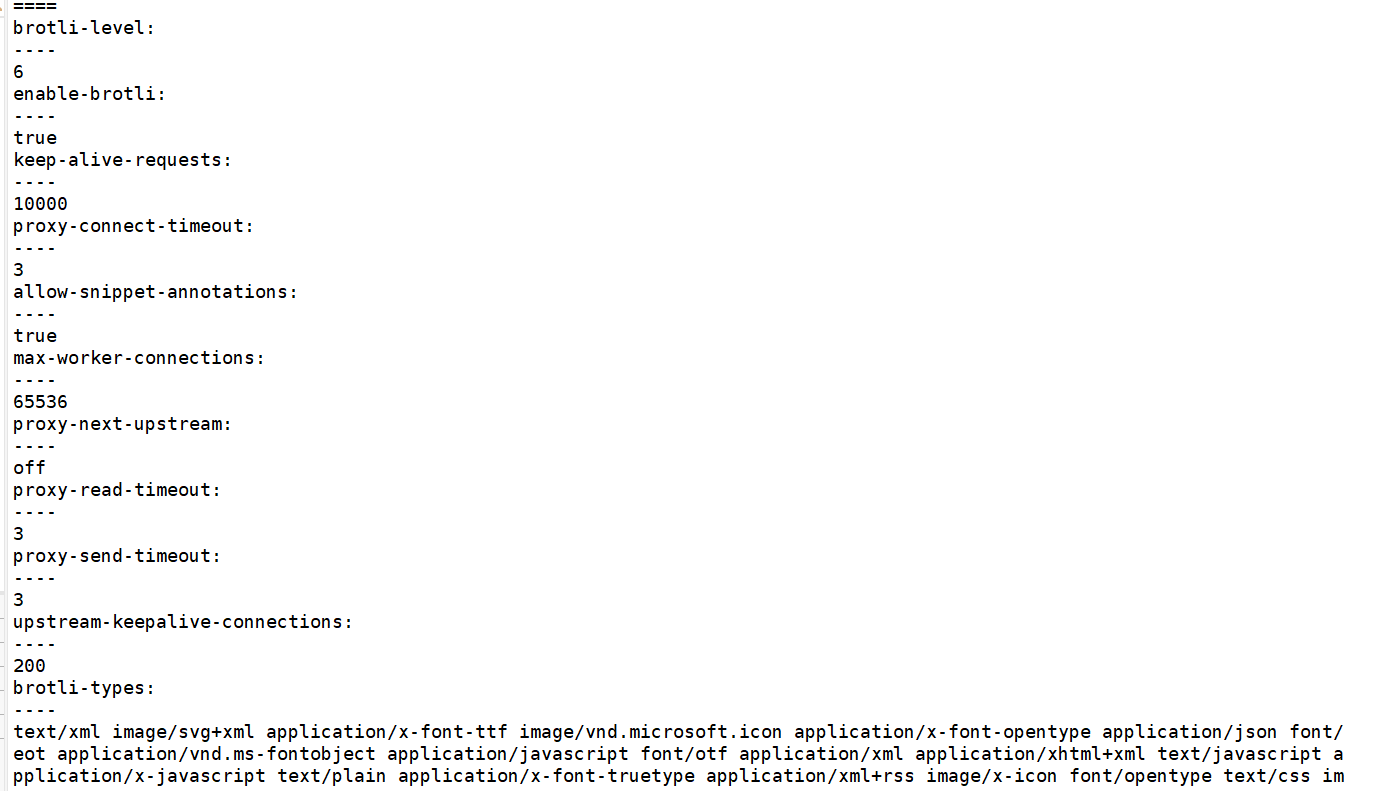
调高 keepalive 连接最大请求数 调高 keepalive 最大空闲连接数 调高单个 worker 最大连接数
这些在安装Ingress前的配置中有该参数(大概在28行)
vim configmap.yaml
apiVersion: v1
kind: ConfigMap
metadata:
  labels:
    helm.sh/chart: ingress-nginx-4.0.10
    app.kubernetes.io/name: ingress-nginx
    app.kubernetes.io/instance: ingress-nginx
    app.kubernetes.io/version: 1.1.0
    app.kubernetes.io/managed-by: Helm
    app.kubernetes.io/component: controller
  name: ingress-nginx-controller
  namespace: ingress-nginx
data:
  allow-snippet-annotations: 'true'
  keep-alive-requests: "10000"
  upstream-keepalive-connections: "200"
  max-worker-connections: "65536"
  proxy-connect-timeout: "3"
  proxy-read-timeout: "3"
  proxy-send-timeout: "3"
  proxy-next-upstream: "off"
  enable-brotli: "true"
  brotli-level: "6"
  brotli-types: "text/xml image/svg+xml application/x-font-ttf image/vnd.microsoft.icon application/x-font-opentype application/json font/eot application/vnd.ms-fontobject application/javascript font/otf application/xml application/xhtml+xml text/javascript application/x-javascript text/plain application/x-font-truetype application/xml+rss image/x-icon font/opentype text/css image/x-win-bitmap"
kubectl apply -f configmap.yaml
kubectl describe configmap ingress-nginx-controller -n ingress-nginx
可以看到优化的参数已经写入配置文件